UniFS™ as a Service
AWS Installation Guide
Follow the steps below to deploy UaaS into an AWS account. The
deployment of UaaS follows security best practices and leverages
CloudFormation to provision cloud resources.
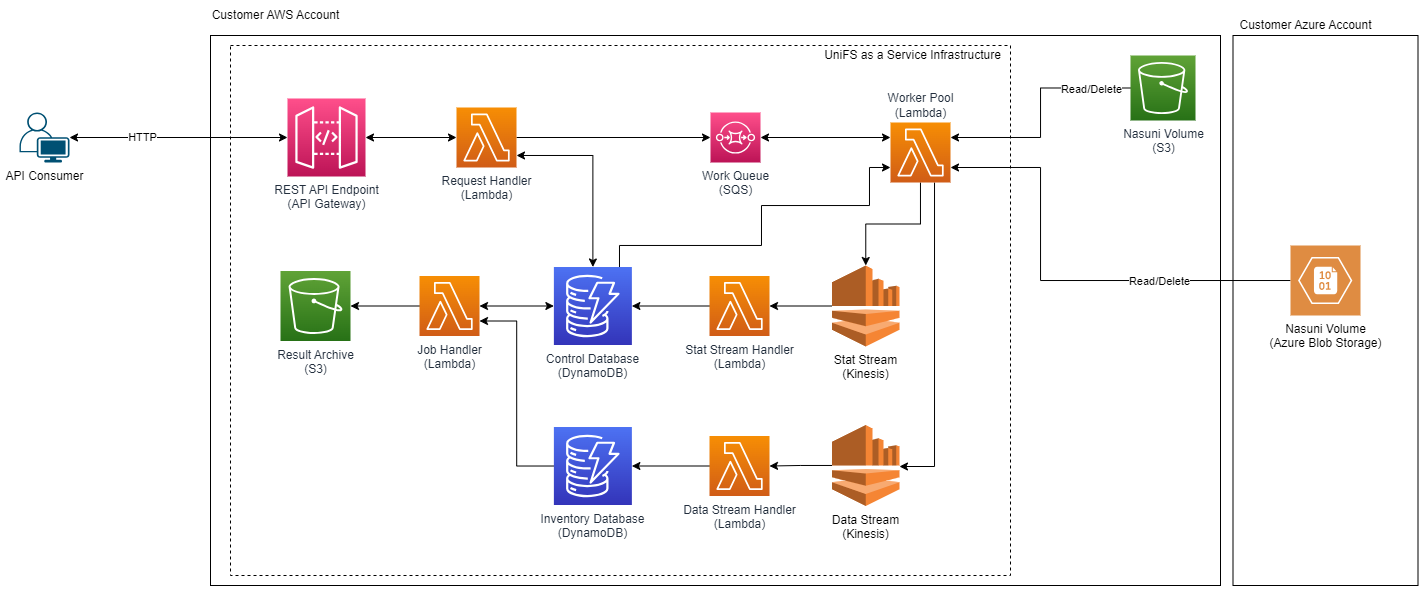
How UaaS on AWS works
To traverse a Nasuni volume on AWS, a serverless architecture is used. Nasuni (Lambda) workers process SQS messages generated as the volume data is analyzed. The inventoried volume object metadata is streamed into Dynamo DB. API Gateway uses the UaaS Lambda to respond to requests.
Prerequisites
As an operator, you must have Administrator permissions on the AWS account into which UaaS is to be deployed. You have the option to deploy using the AWS console interactively, or by using the AWS command line.
Procedure
Follow these steps to deploy UaaS on AWS.
1. Bootstrap the required IAM resources using CloudFormation
The first step is to create a service role that defines the minimal permissions needed to deploy the UaaS stack in your AWS account. The CloudFormation template below creates the following IAM resources:
- The deployment policy itself, which defines the minimal permissions needed to deploy UaaS.
- A deployment role, to which the deployment policy is attached, granting the role permissions to deploy UaaS.
- A user policy, which permits assuming the deployment role above.
- A user group, to which the user policy is attached, allowing members of the group to assume the deployment role, and pass it to the main UaaS CloudFormation stack.
Via Console
Click this link for the CloudFormation quick-create wizard
Via CLI
aws cloudformation create-stack \
  --stack-name Nasuni-UaaS-IAM \
  --template-url https://s3.us-east-2.amazonaws.com/uaas-website-stack-s3bucketwebsite18ddbcd4-1pzdeo4hpnrxw/latest/uaas-deploy-permissions.yaml \
  --capabilities CAPABILITY_IAM
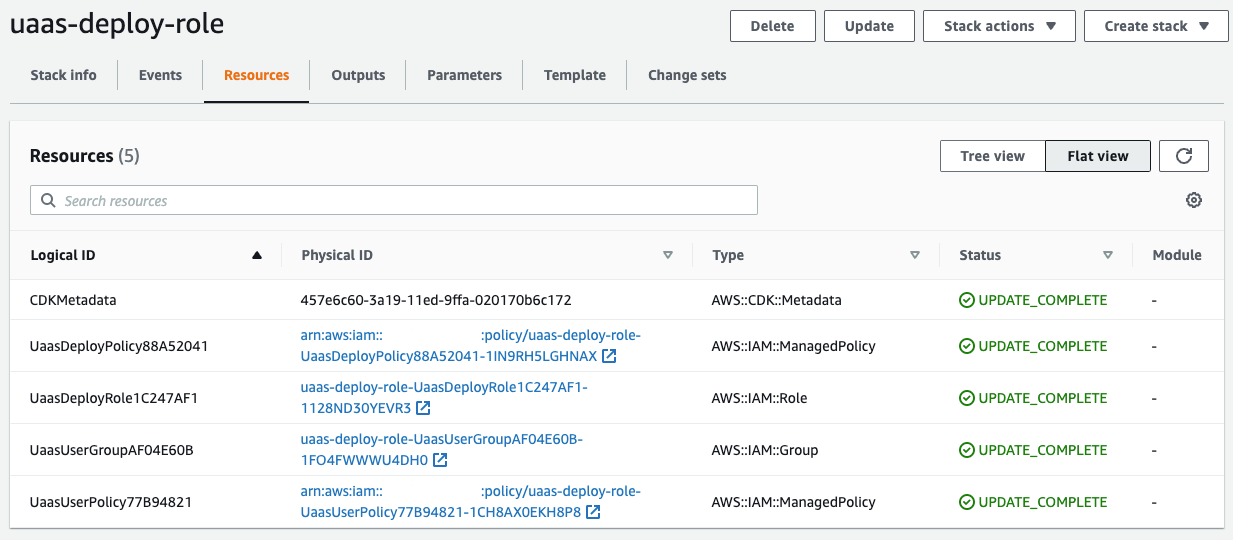
2. Inspect the IAM stack
The Resources tab in CloudFormation displays the elements
described above:
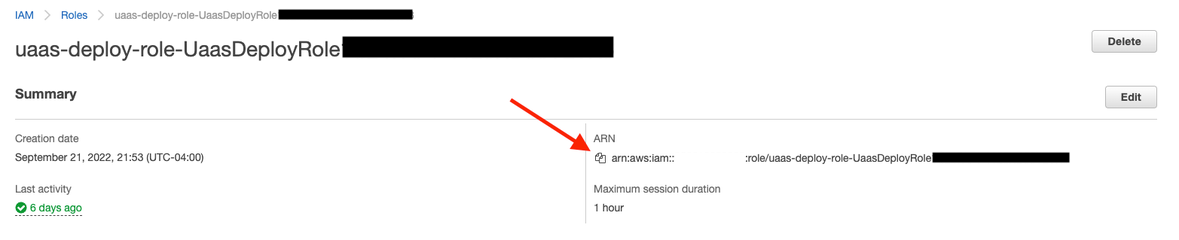
3. Get the created IAM role
To deploy UaaS, you need the unique identifier of the deployment policy that was created by the IAM CloudFormation stack.
To get the Amazon Resource Name (ARN) of the IAM Role, navigate to the UaasDeployRole
resource from the same resource list referenced above. You can then copy the ARN from this page:
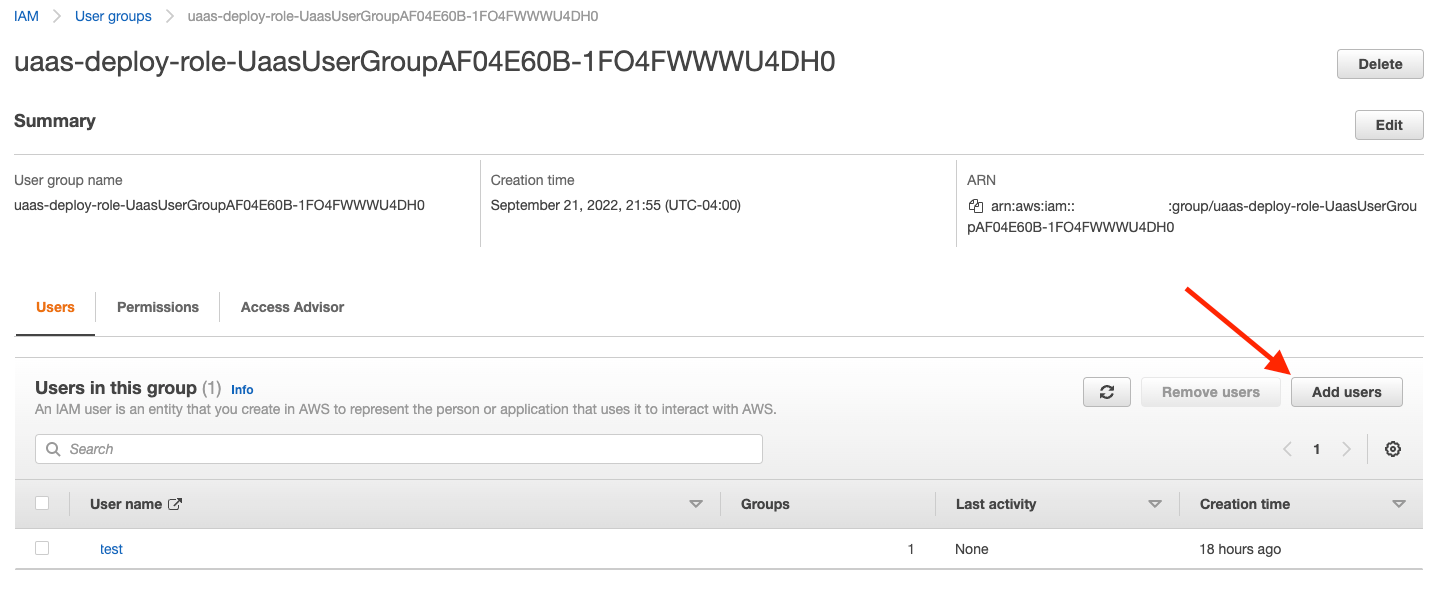
4. a. Assign users to UaasUserGroup group (Traditional IAM User)
Now that the new deployment service role is created, you must grant an IAM user permissions to assume this role. You do this by adding any users who run the deployment to the group created as part of the above stack.
On the Users in this Group pane, click Add users.
4. b. Add UaasUser permissions to IAM Identity Center (SSO User)
Note
You will need to have access to modify objects in IAM Identity center, and possibly access to the Master Payer Account (depending on your organization's setup), in order to perform this operation.
- Go to the cloudformation deploy-role stack you created in Step 3.
- Go to Resources tab
- Search for
UaasUserPolicy - Click on the
Physical IDARN link.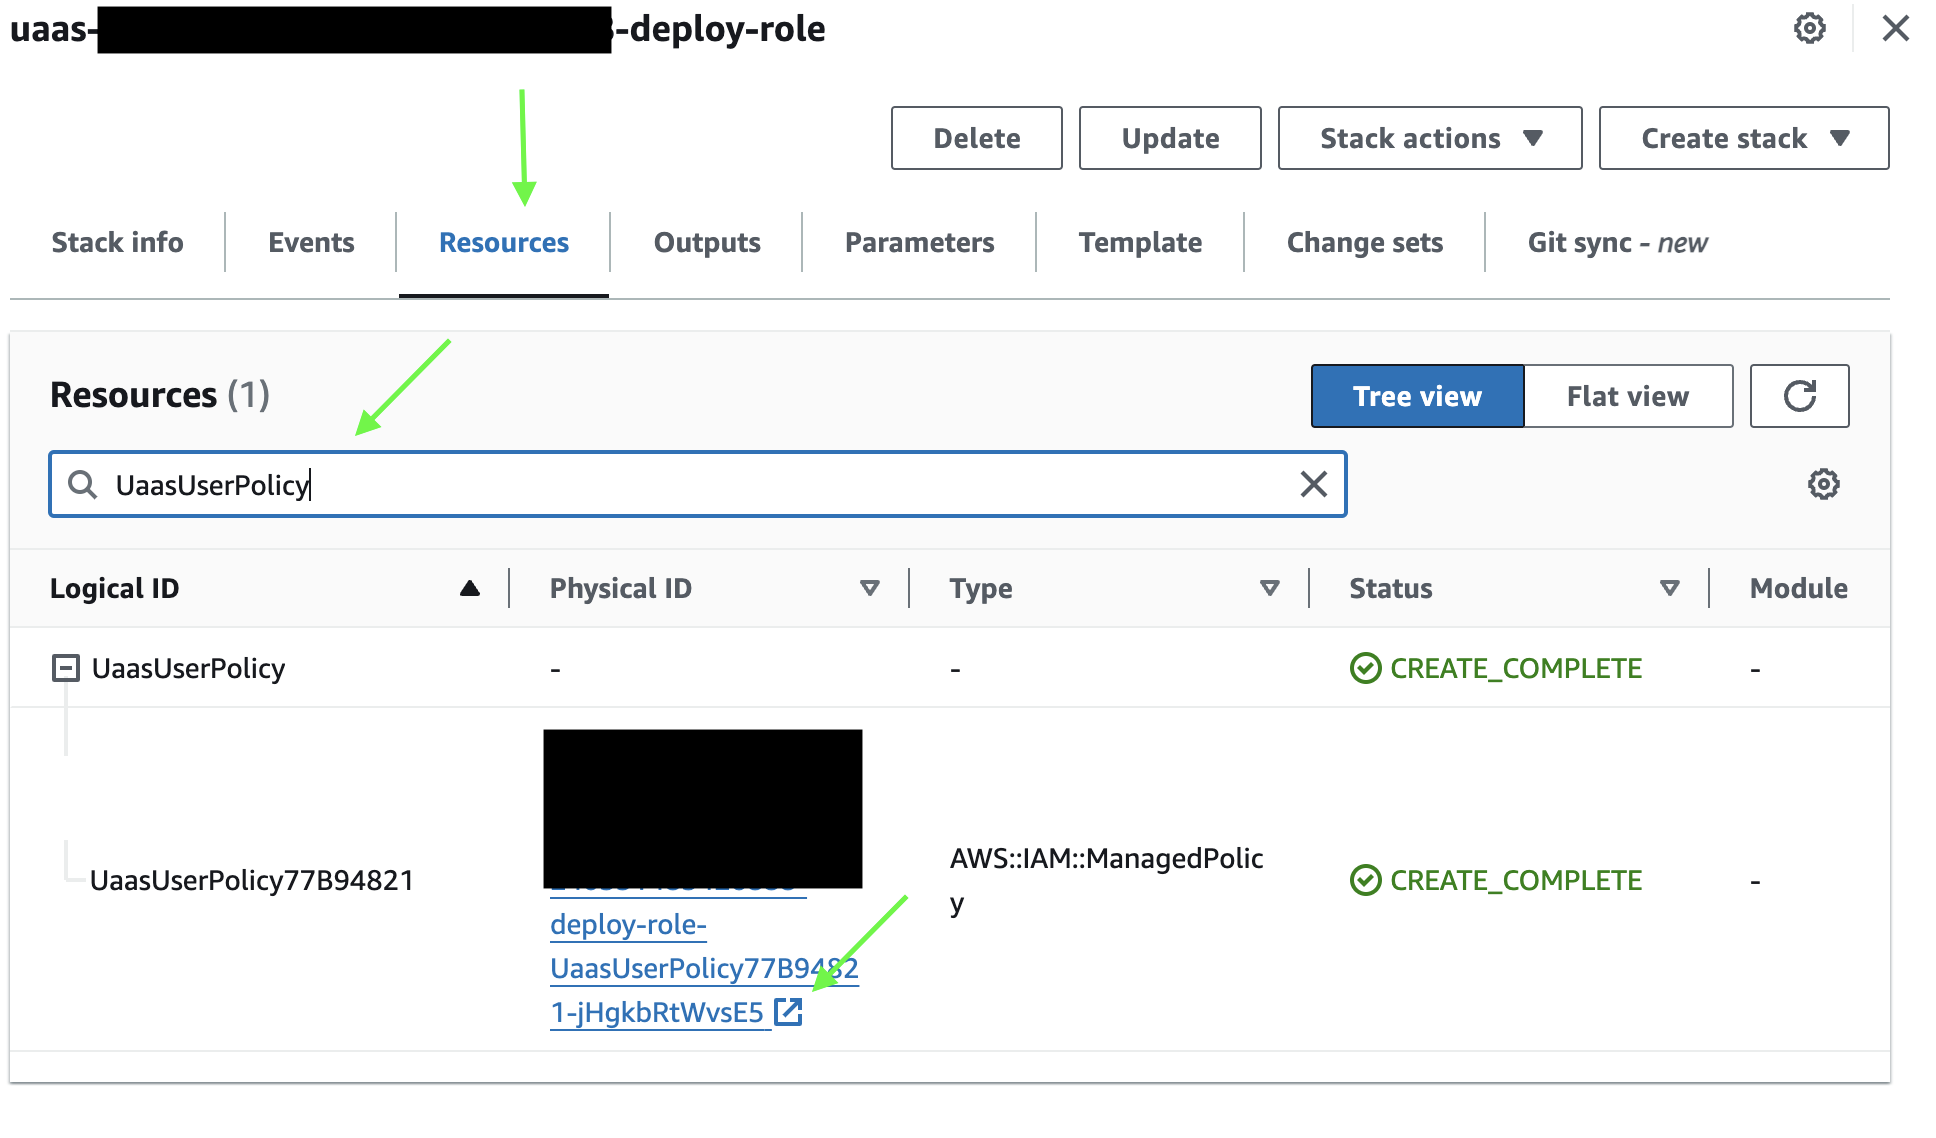
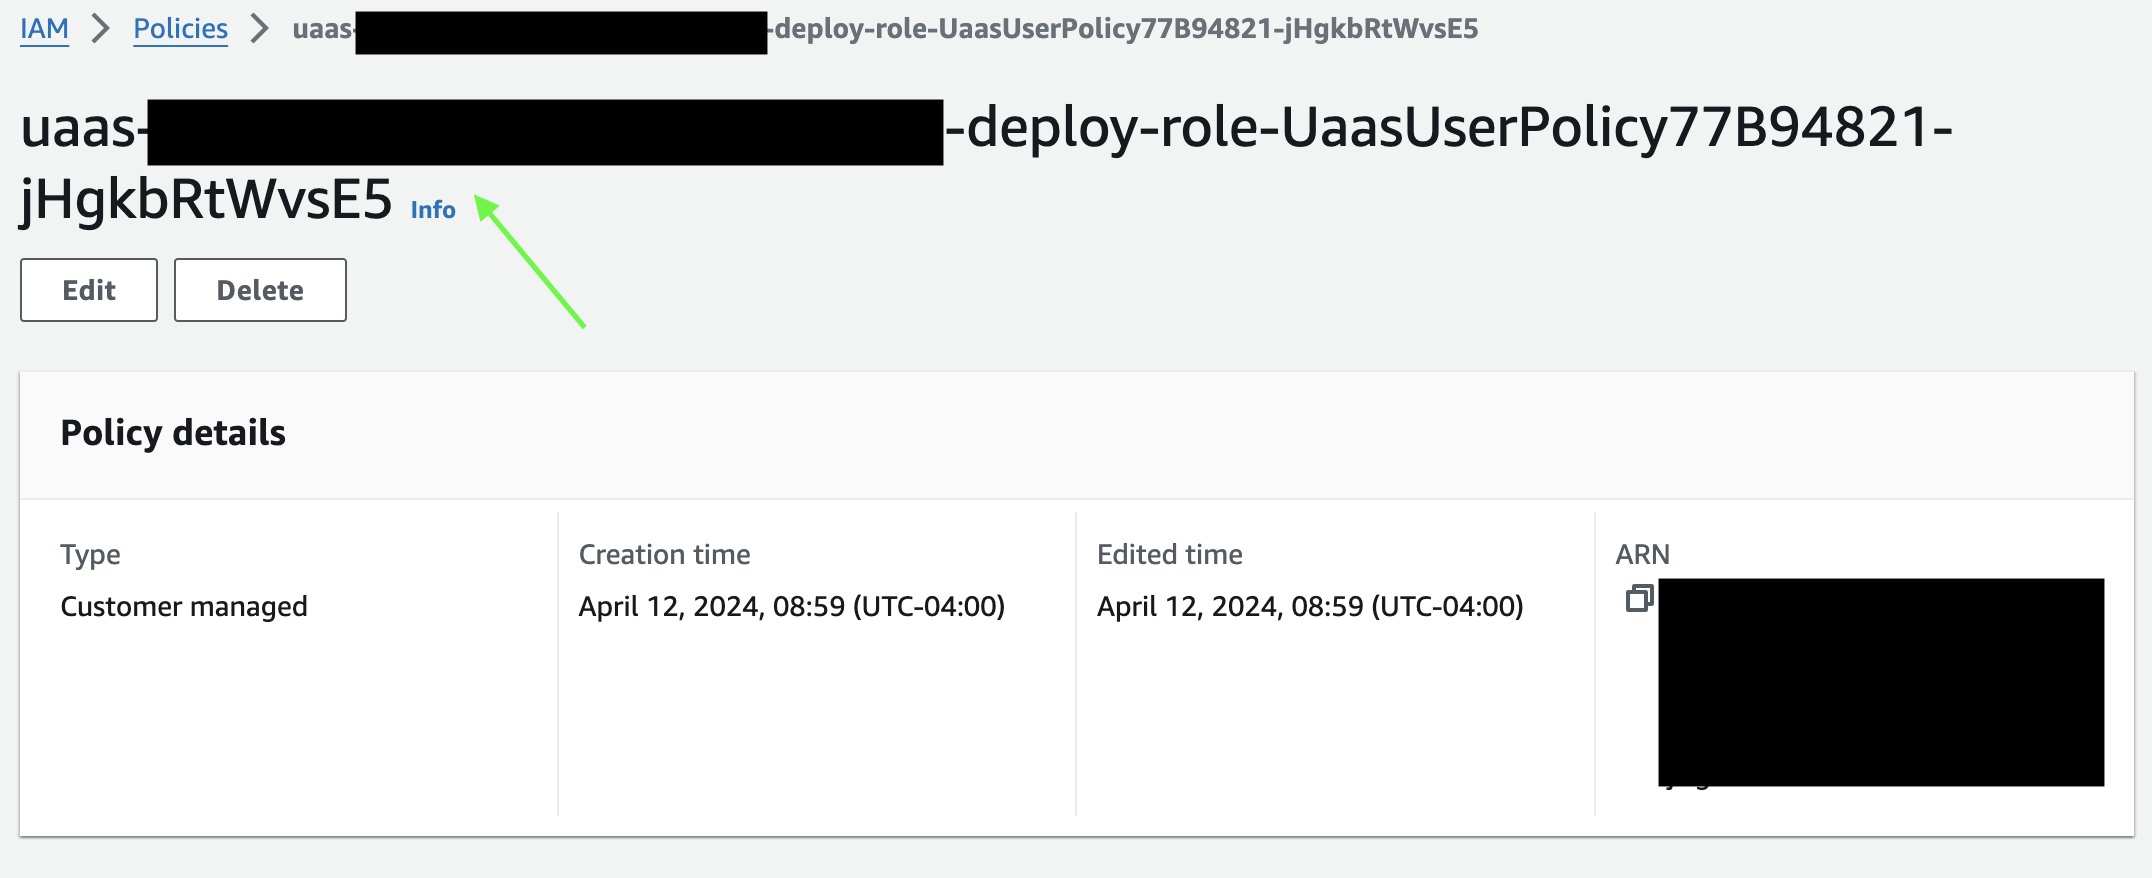
- Copy the name at the top of the page (NOT the ARN)
- Open your IAM Identity Center -> Multi-account permissions -> Permission sets. "IAM Identity Center" may be located in your Master Payer Account.
- Either create a new permission set, which will need to be provisioned against the users who will deploy UaaS, or open an existing permission set that is already applied to users who will deploy UaaS.
- Under Customer managed policies click
Attach policies. - Enter the name of the
UaasUserPolicyyou copied earlier and clickAttach Policies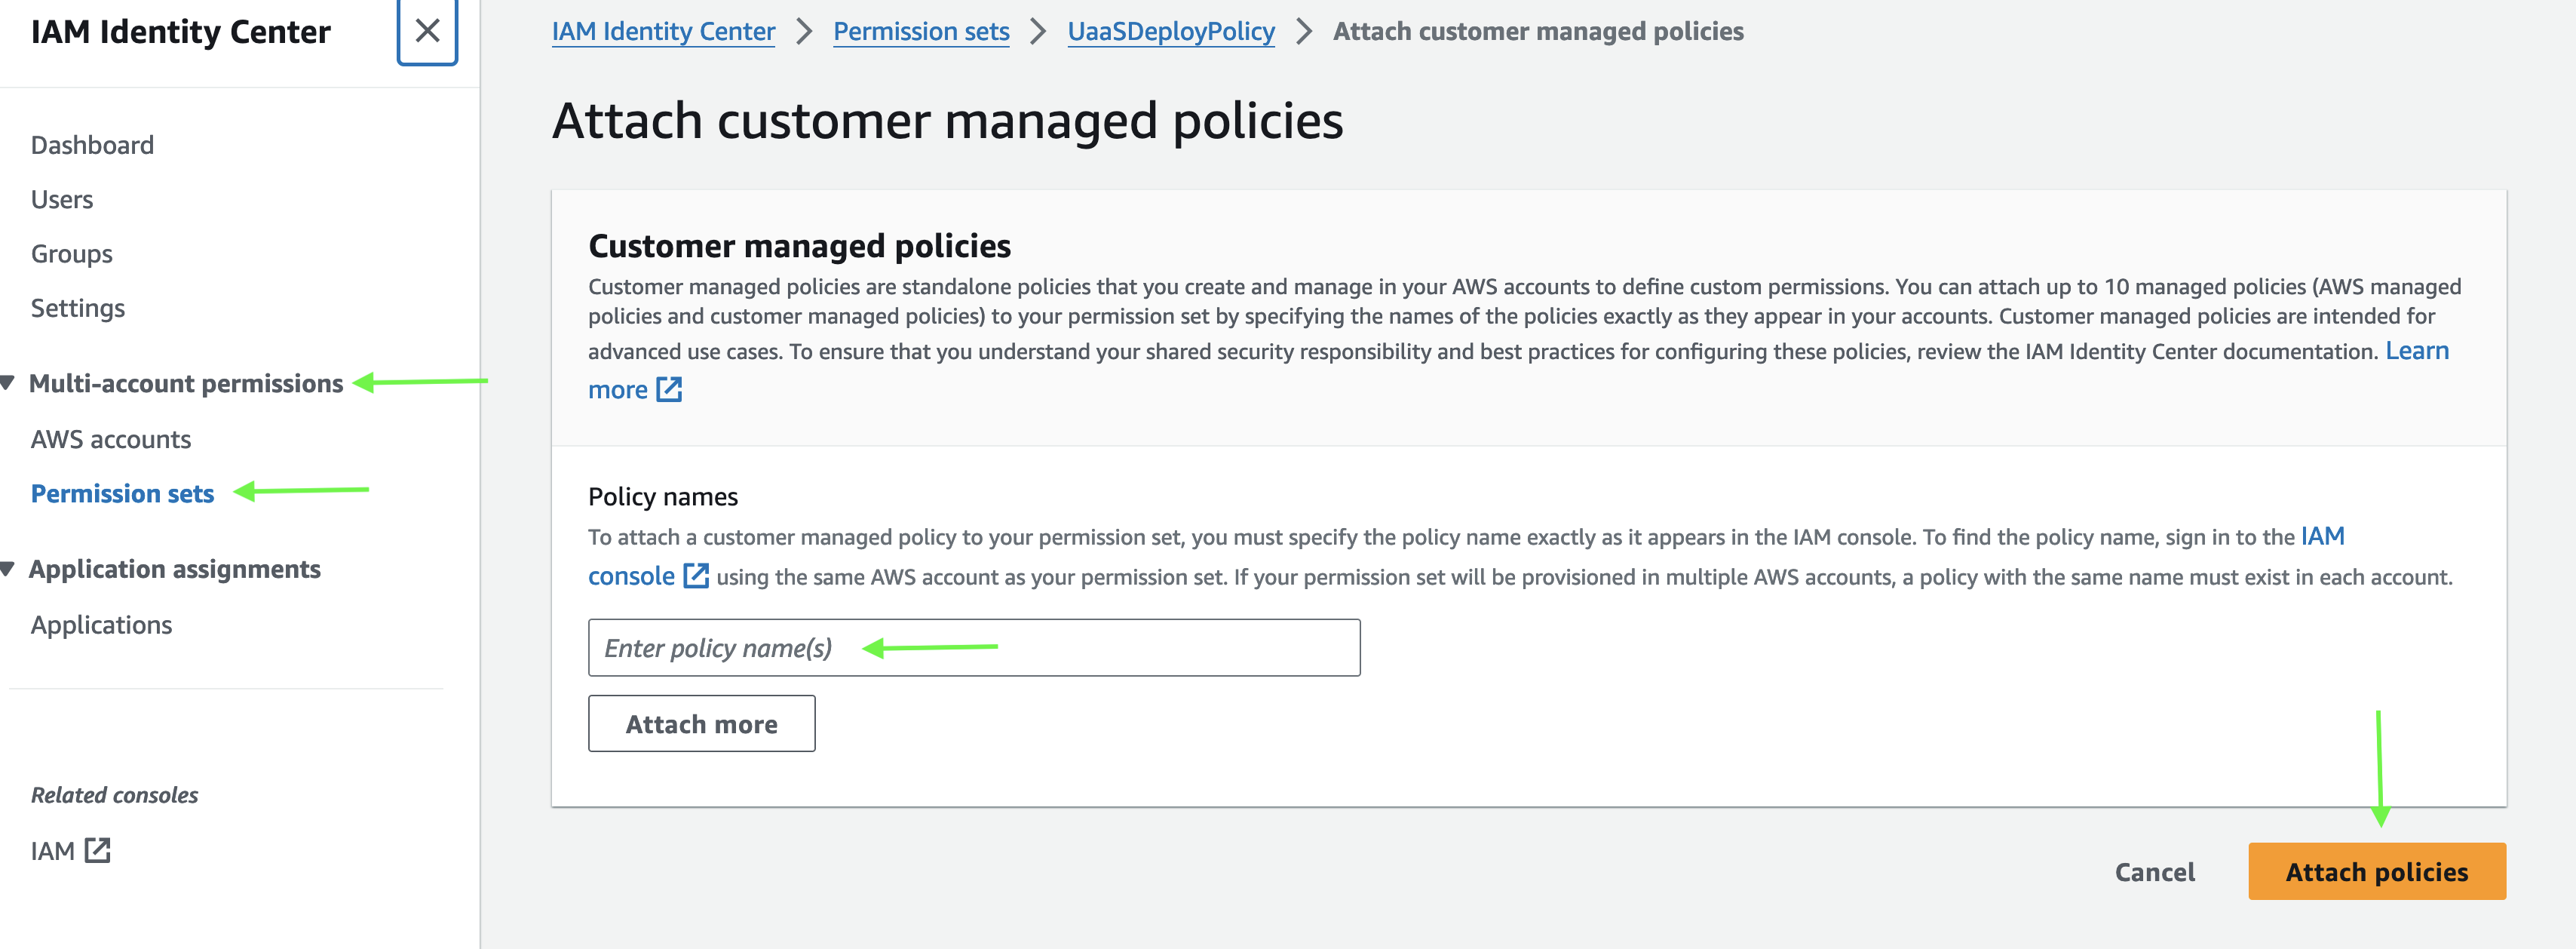
- Once attached, you can continue with Step 5. Deployment using the console.
- If you are still having trouble with deployment using the
UaasDeployRolewith your SSO user, repeat these steps with theUaasDeployPolicycreated in Step 3
5. Deployment using the console
With your IAM auth configured and the UaaS serial number in hand, you can proceed to deploy UaaS to your AWS account.
If you want to deploy using the CLI, proceed to step 6.
To deploy using the console, follow these steps:
5a. First, access the deployment page.
5b. From the dropdown list in the "Deploy to AWS" section, select the appropriate regional template. The cloud services should be deployed in the same region as the volume with which it will interact in order to avoid egress fees associated with transferring data across regions.
5c. Optionally, you can also enter a name for your stack here.
5d. Click Deploy to AWS.
5e. The Create stack page appears. You do not need to fill out any information on this page. Click NEXT.
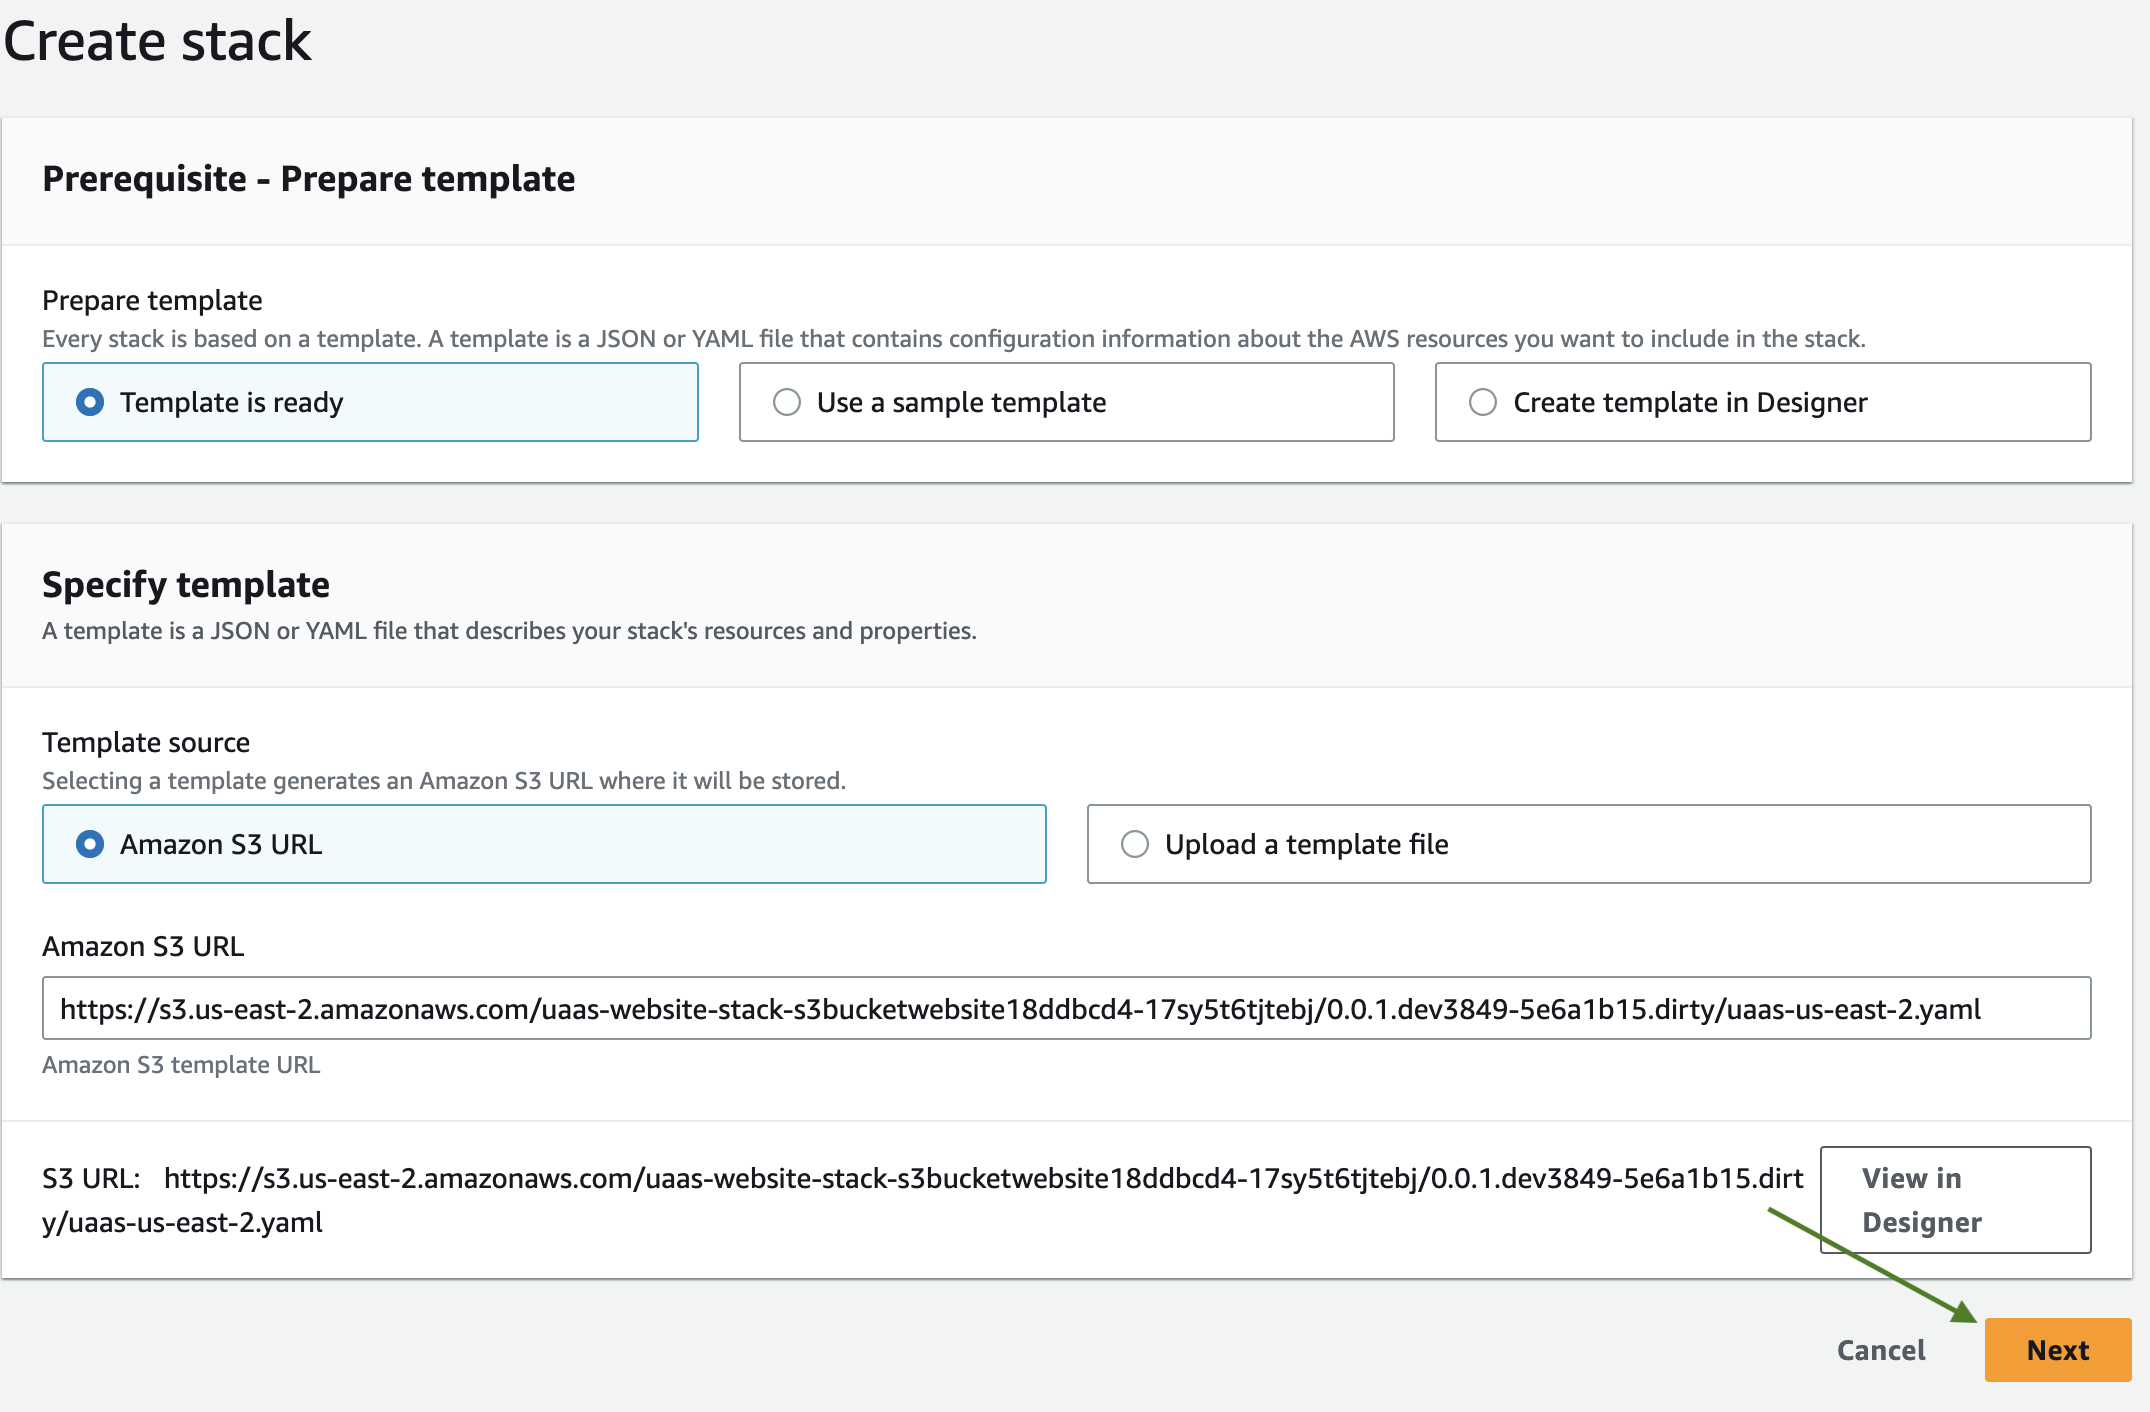
5f. The Specify stack details page appears. Fill in the following required parameters (the rest are defaults and do not need to be changed):
- Stack name - a friendly name used to identify the stack
- SerialNumber - the UaaS serial number acquired from the Nasuni Account Dashboard (account.nasuni.com)
- AuthCode - the UaaS auth code, also acquired from the Nasuni Account Dashboard.

In order to configure UaaS to use VPC networking for its Lambda functions, the following optional parameters must both be populated. If they are not populated, the deployment process will automatically create new networking resources:
- SubnetIds - A comma delimited list of existing VPC Subnet IDs to be used by the UaaS Lambda functions
- VpcId - The ID of an existing VPC containing the Subnets provided above

In order for UaaS to fully function with VPC networking, the following requirements must be met:
- Both
SubnetIdsandVpcIdparameters must be provided. If either parameter is left blank, the VPC functionality will not be enabled. - A Public NAT Gateway must be configured for the VPC and Subnet(s) provided. This will allow the VPC-enabled Lambda functions to communicate with all the required cloud services and the Nasuni NOC.
To speed up NDS by leveraging a serverless cache, set CacheEnabled parameter to True.
5g. Click NEXT on the bottom right of the page.
5h. The Configure stack options page appears. In the Permissions section, enter either the IAM role name or the IAM role ARN of the UaaSDeployRole that you created above. This gives CloudFormation the required permissions to deploy all parts of your Uaas stack.
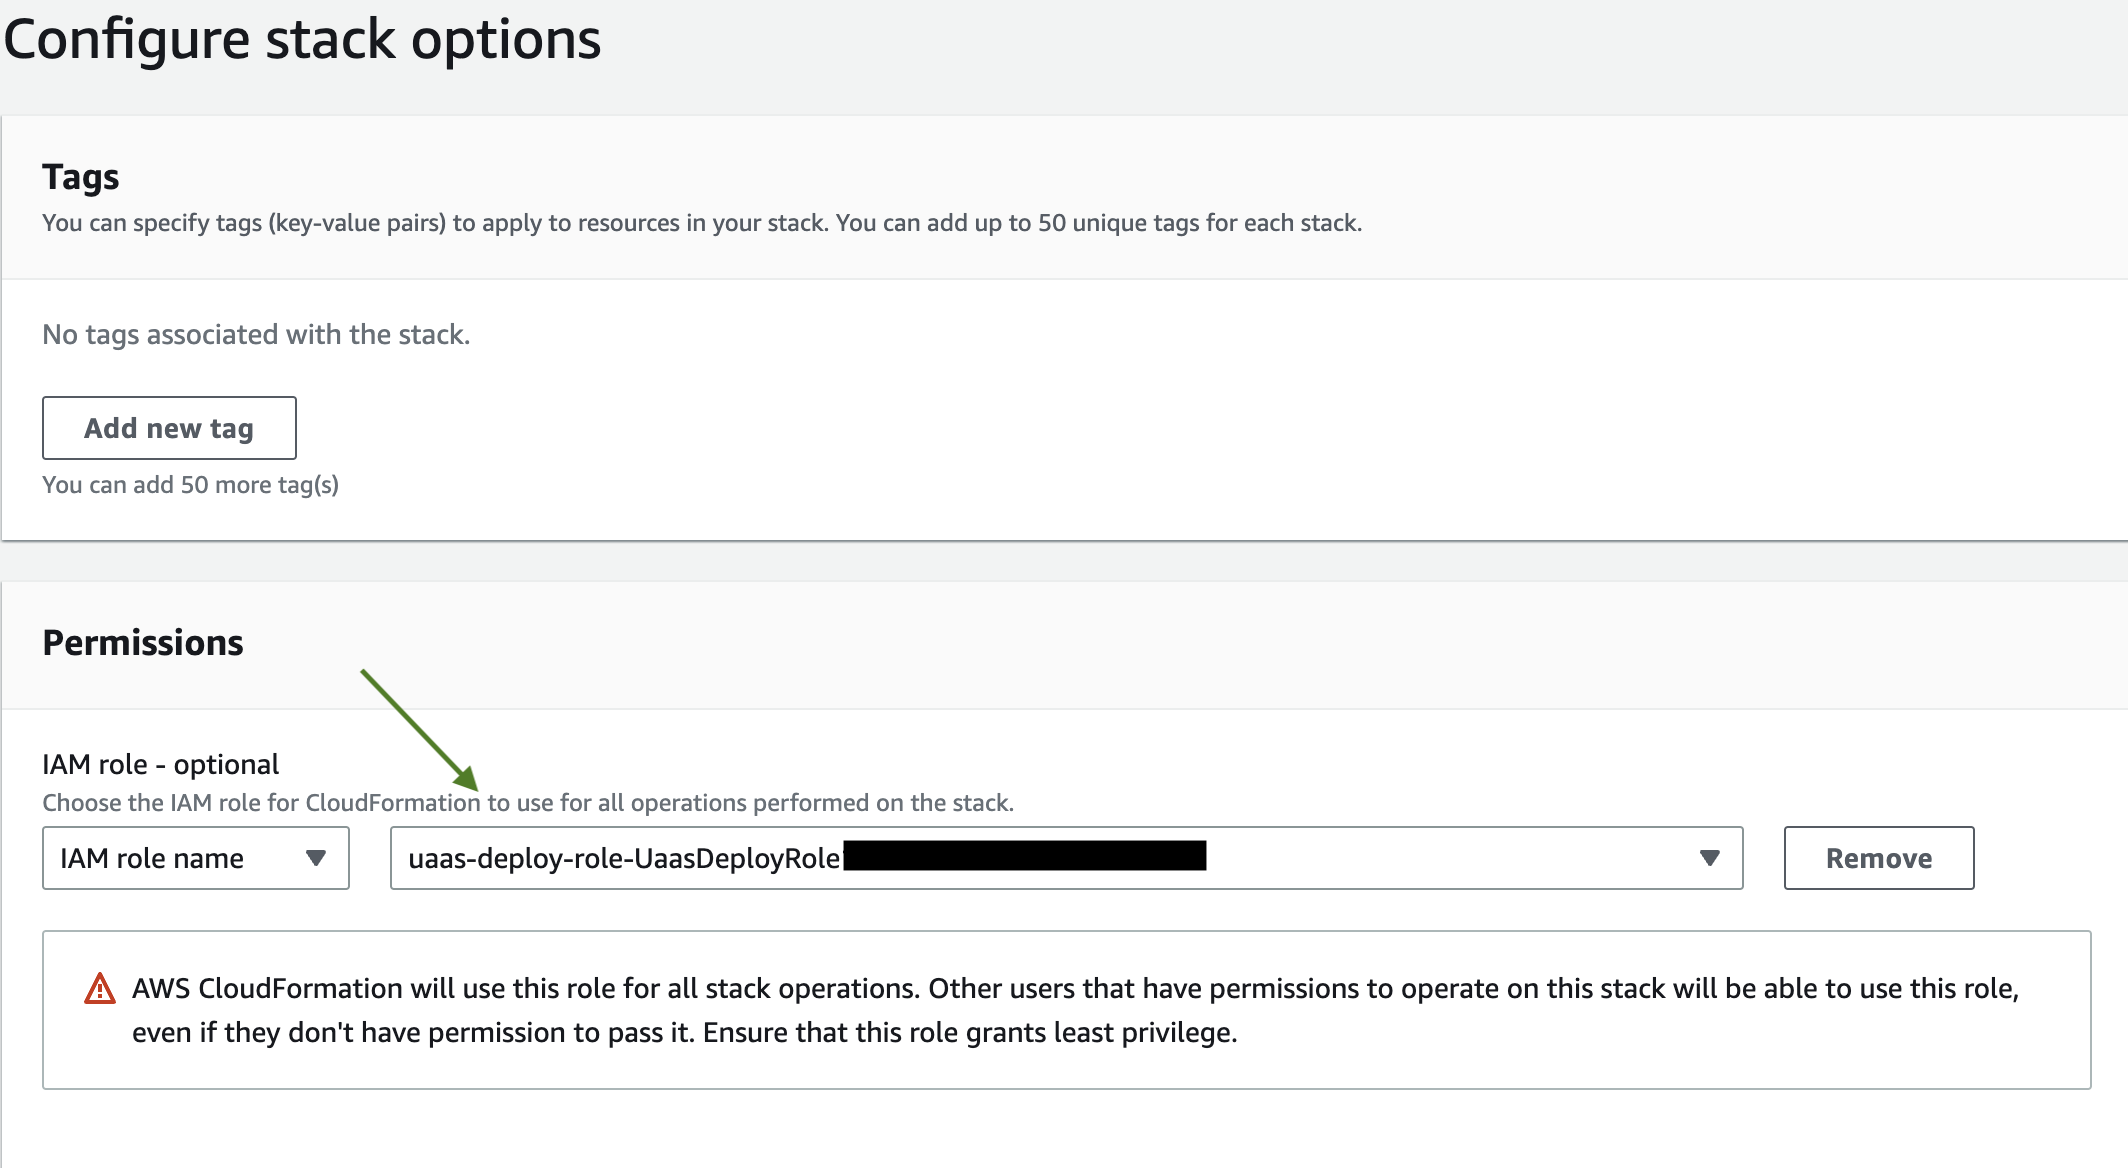
5i. No other details on this page need to be filled out. Click NEXT on the bottom right of the page.
5j. On the following page, review the details of your stack template. In the "Capabilities" section, review the message regarding the IAM role creation and, if acceptable, mark the acknowledgement checkbox. If everything is correct, click SUBMIT to deploy your stack.

6. Deployment using the AWS Command Line
To deploy using the AWS CLI, pass the generated deployment role:
aws cloudformation create-stack \
  --stack-name Nasuni-UaaS-Platform \
  --template-url <templateUrl> \
  --parameters ParameterKey=SerialNumber,ParameterValue=<uaasSerialNumber> ParameterKey=AuthCode,ParameterValue=<uaasAuthCode> \
  --capabilities CAPABILITY_IAM \
  --role-arn <generatedRoleArn>
where <templateUrl> is the URL copied in the previous step,
<uaasSerialNumber> is the UaaS serial number,
<uaasAuthCode> is the UaaS auth code,
and <generatedRoleArn> is the actual ARN for the generated IAM role from the bootstrap step above.
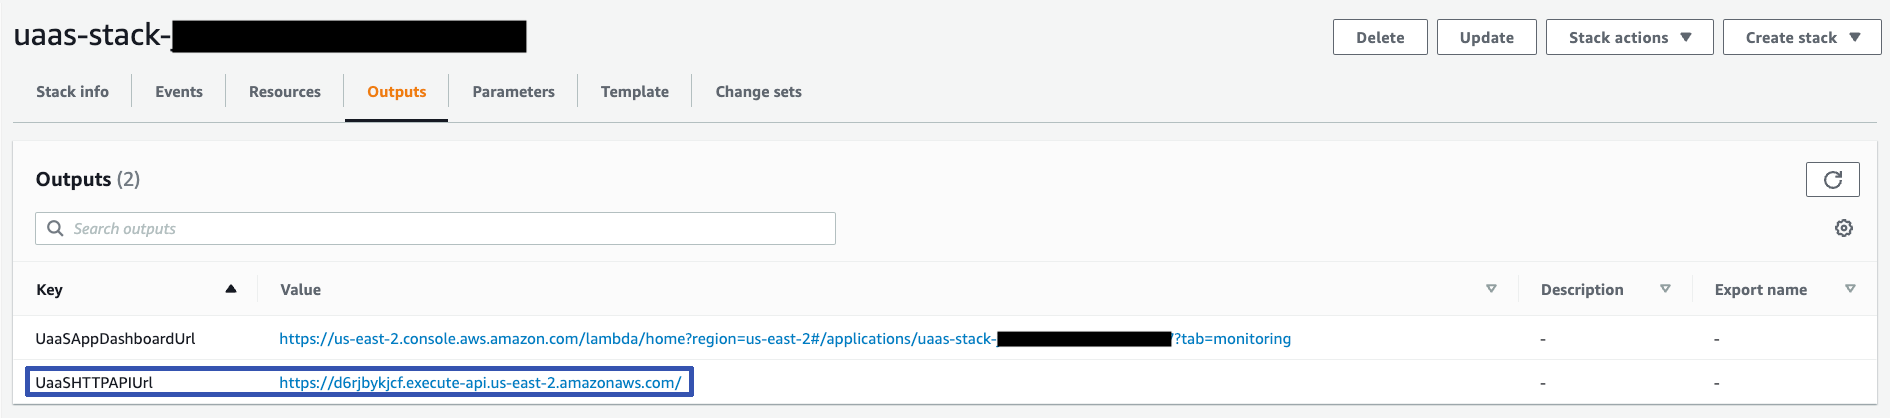
7. Gather the base API URL from outputs
After the stack is deployed, the base API URL is made available in
the stack's outputs. This URL will be entered in the NMC when configuring the Snapshot Retention policy for a volume. To retrieve this value, visit the Outputs tab for
your CloudFormation stack and collect the Value for the key titled UaaSHTTPAPIUrl:
Updates
Important: Ensure that no jobs are currently active before updating your stack. Notifications are created in the NMC when a Snapshot Retention job starts and finishes.
For updates, you can follow the installation procedure and simply provide the updated stack template. You can use either the CLI or the console method; the update route does not have to be the same as you used for installation.
If you are using the console, then you can update your stack from the main page under the Update AWS section.
If you are using the CLI, you can use the latest template URL, which always points to the latest version of UaaS:
https://s3.us-east-2.amazonaws.com/uaas-website-stack-s3bucketwebsite18ddbcd4-1pzdeo4hpnrxw/latest/release/uaas-{region}.yaml
Simply replace {region} with the AWS region of your existing stack.
The new stack is installed over the existing stack. No data loss occurs.
Decommissioning a stack
The following procedure can be used to remove a stack and all of its associated resources when it is no longer needed.
Tearing down using the Console
-
First, log in to your Amazon Web Services console.
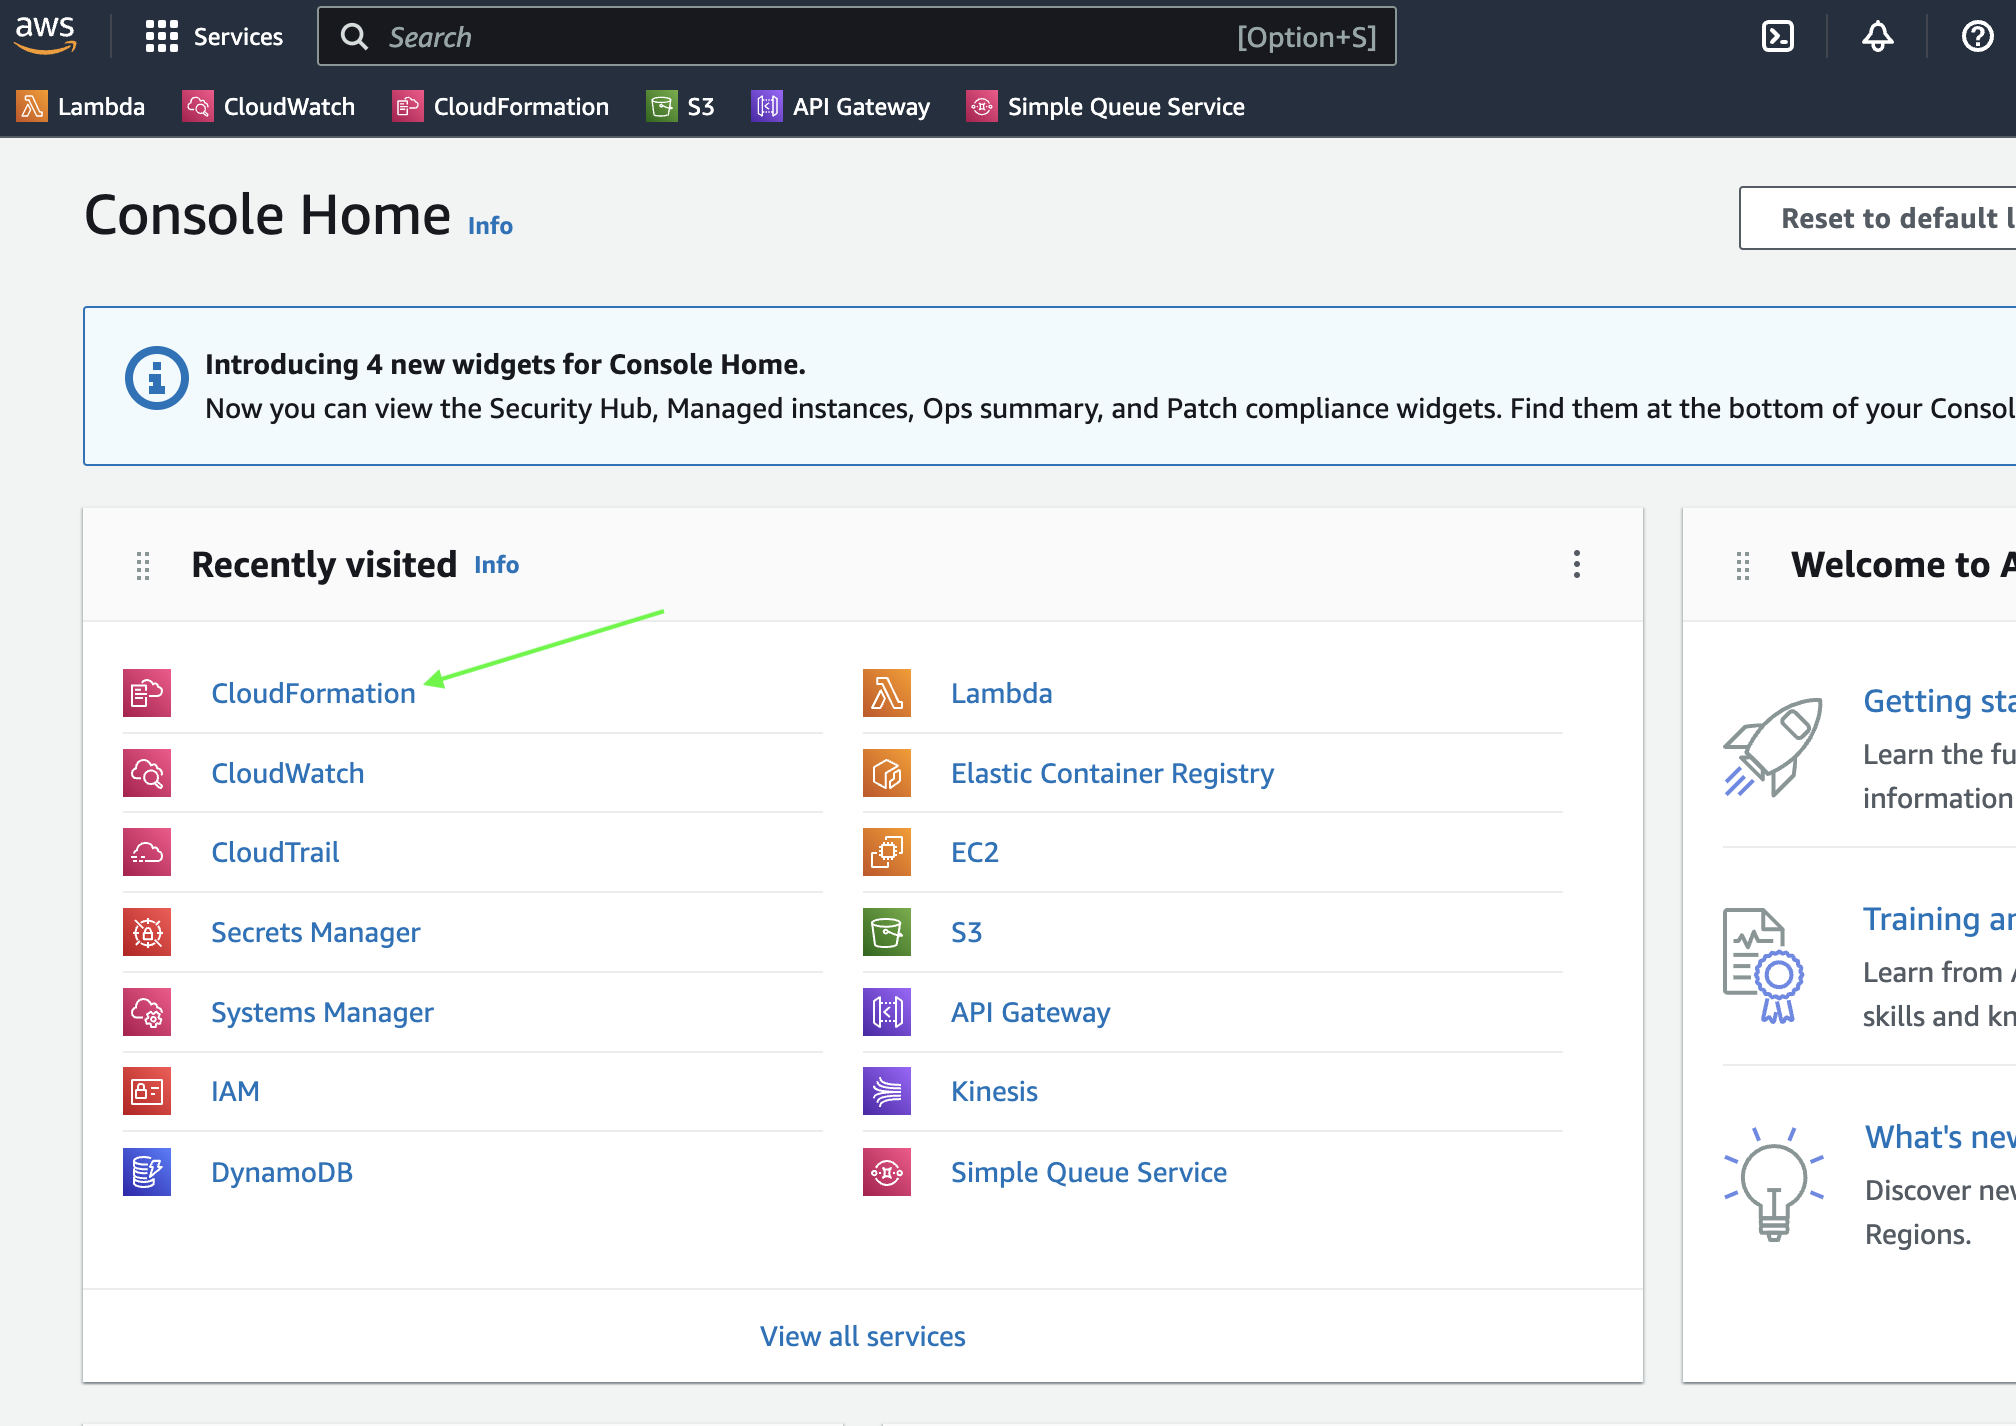
-
Click
CloudFormation. If it is not listed, search for it and then click it.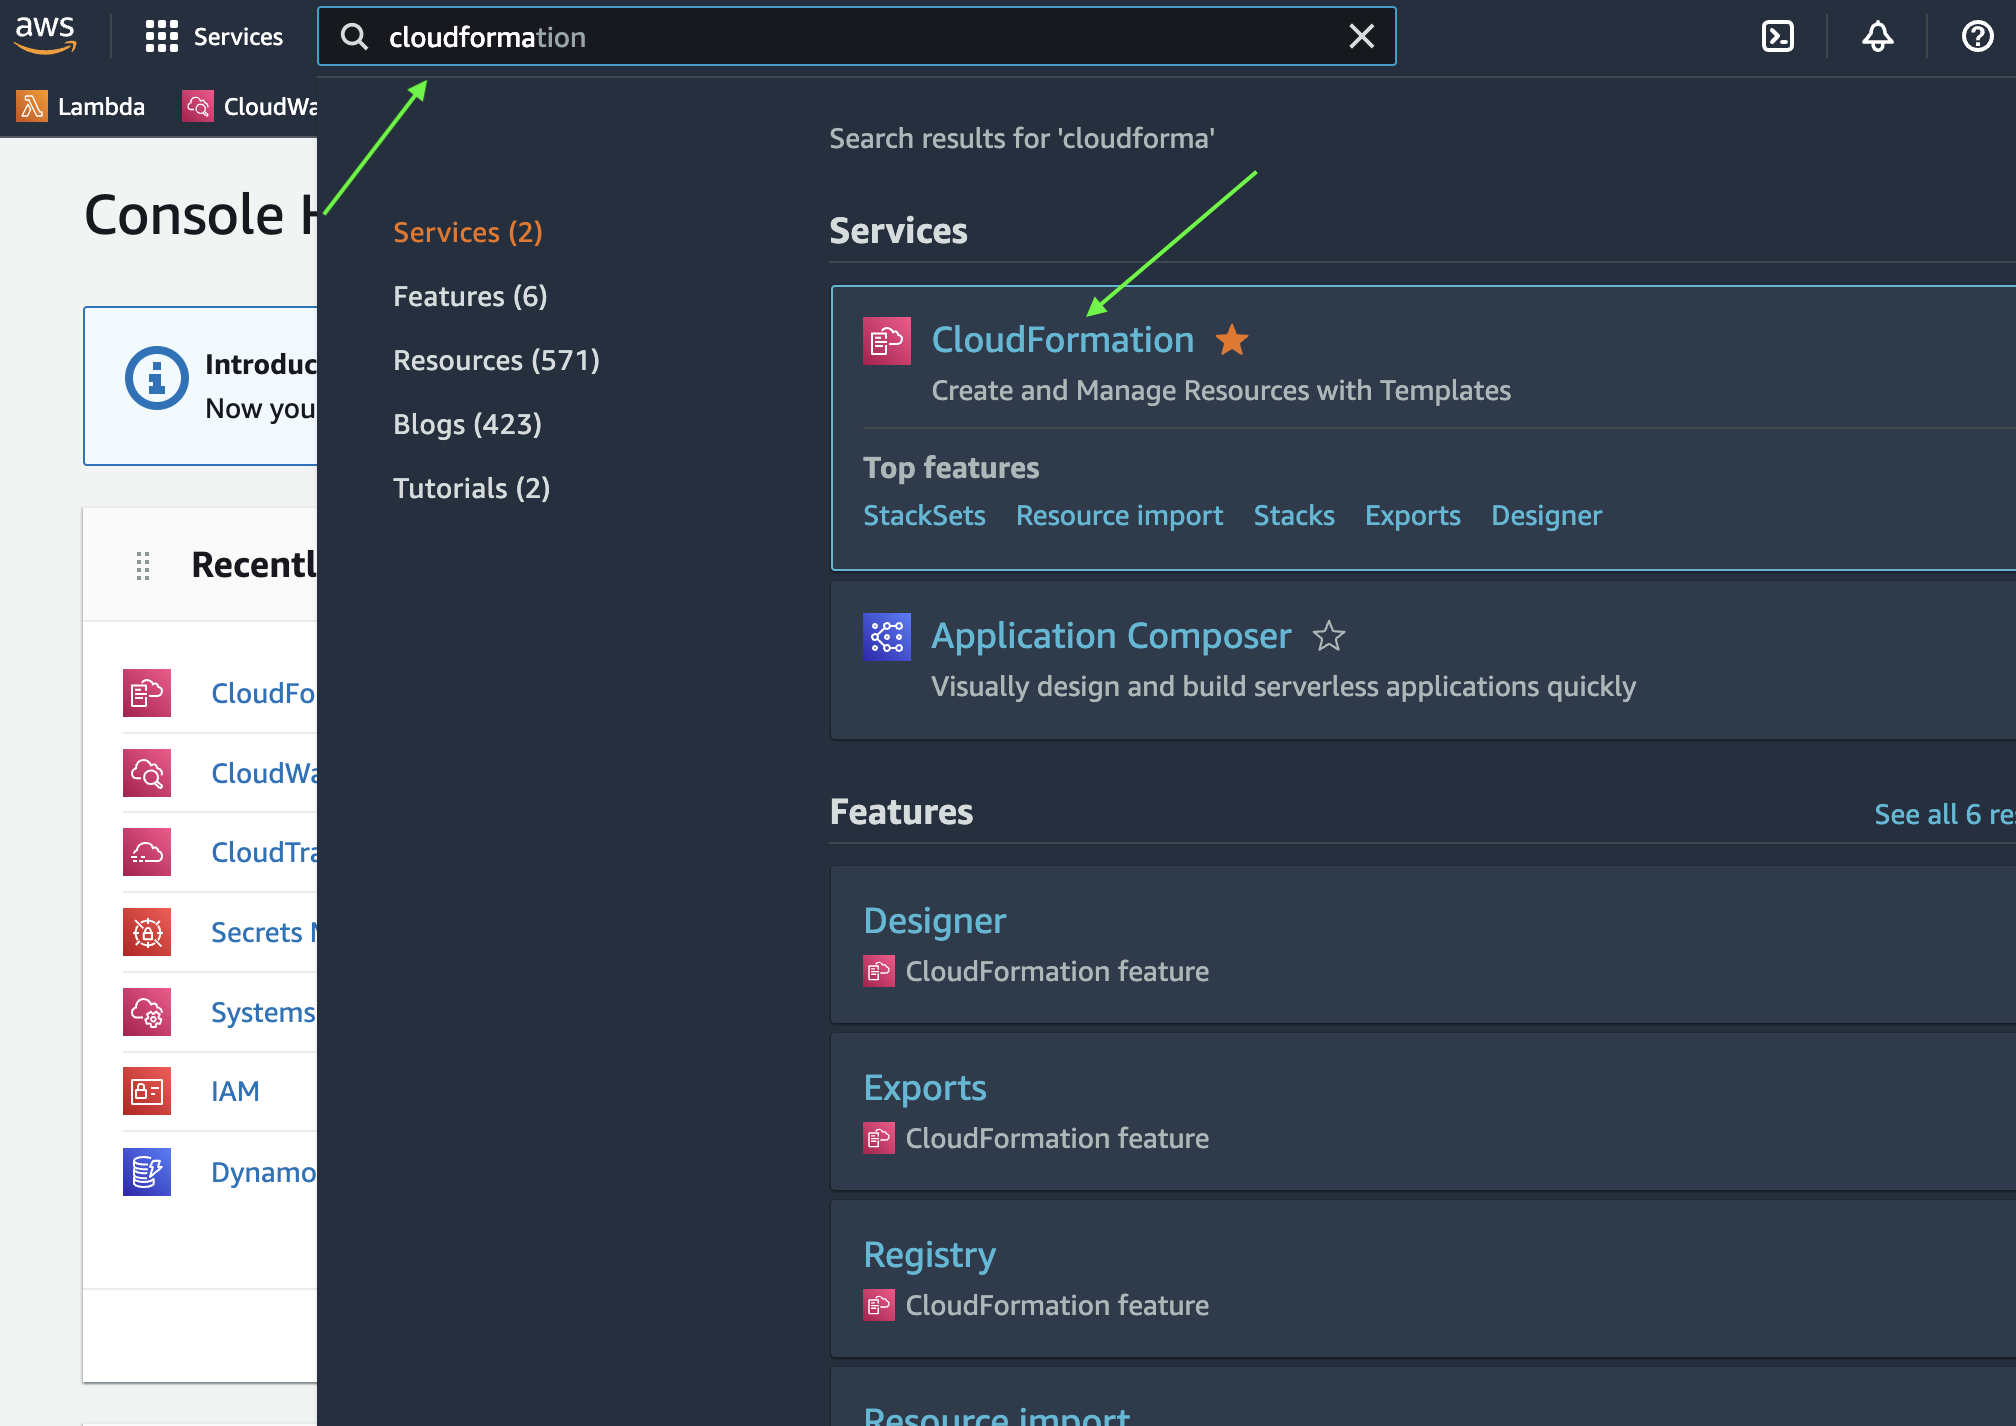
-
On the
CloudFormationpage, clickStacks. On theStackspage, search for your stack and pressEnterto display results.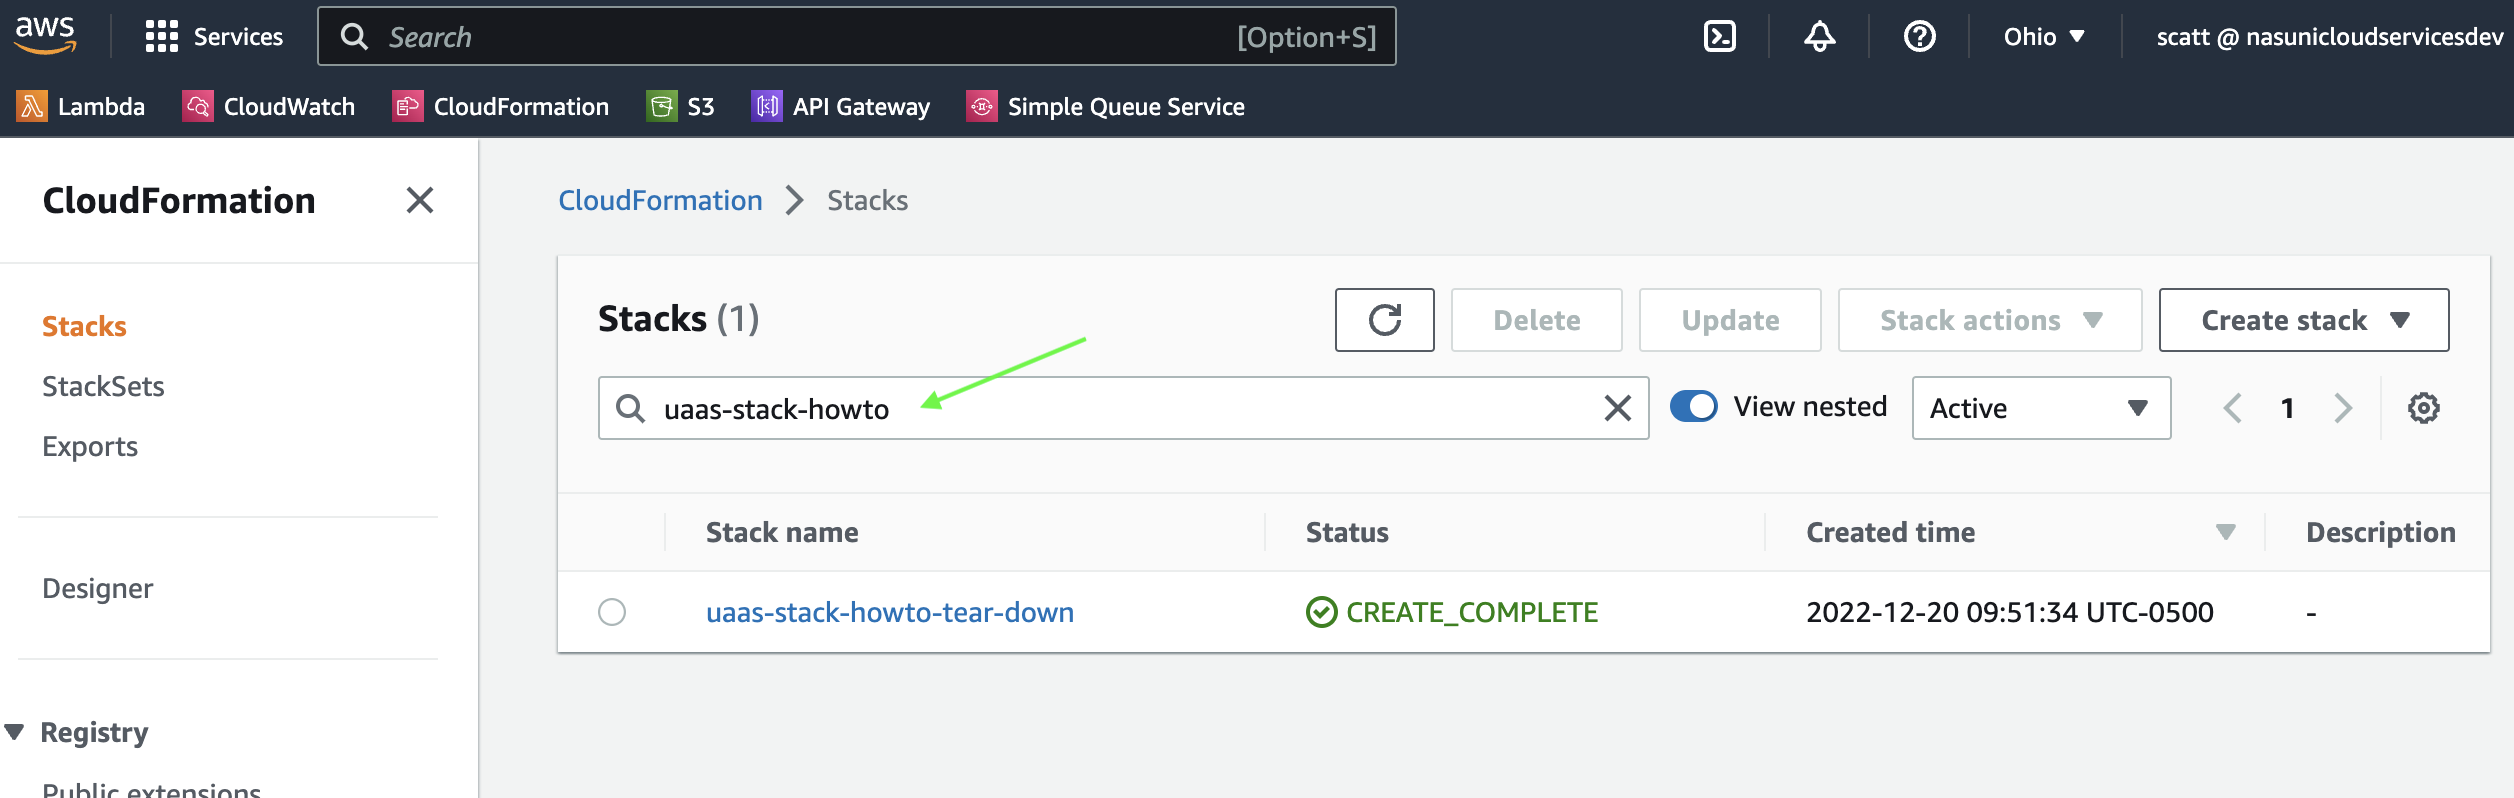
-
Click on the circle next to your stack, then click
Delete.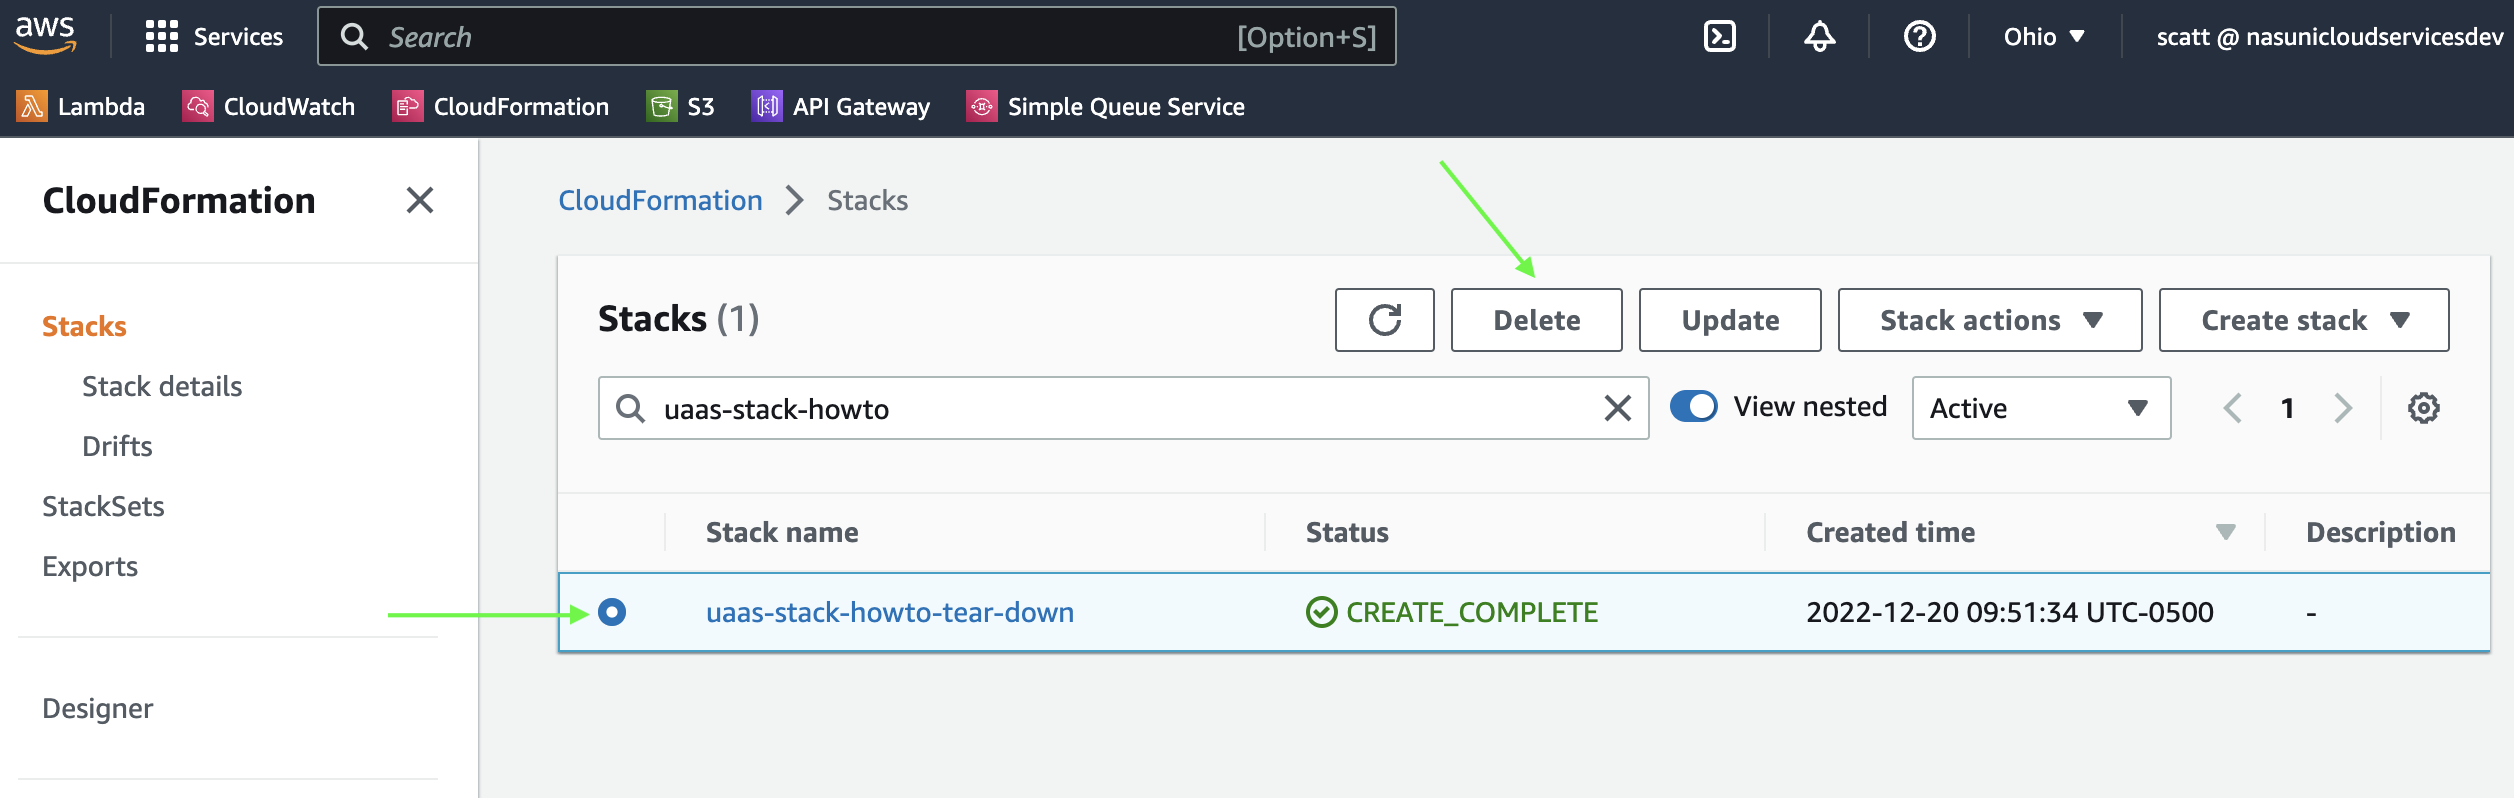
-
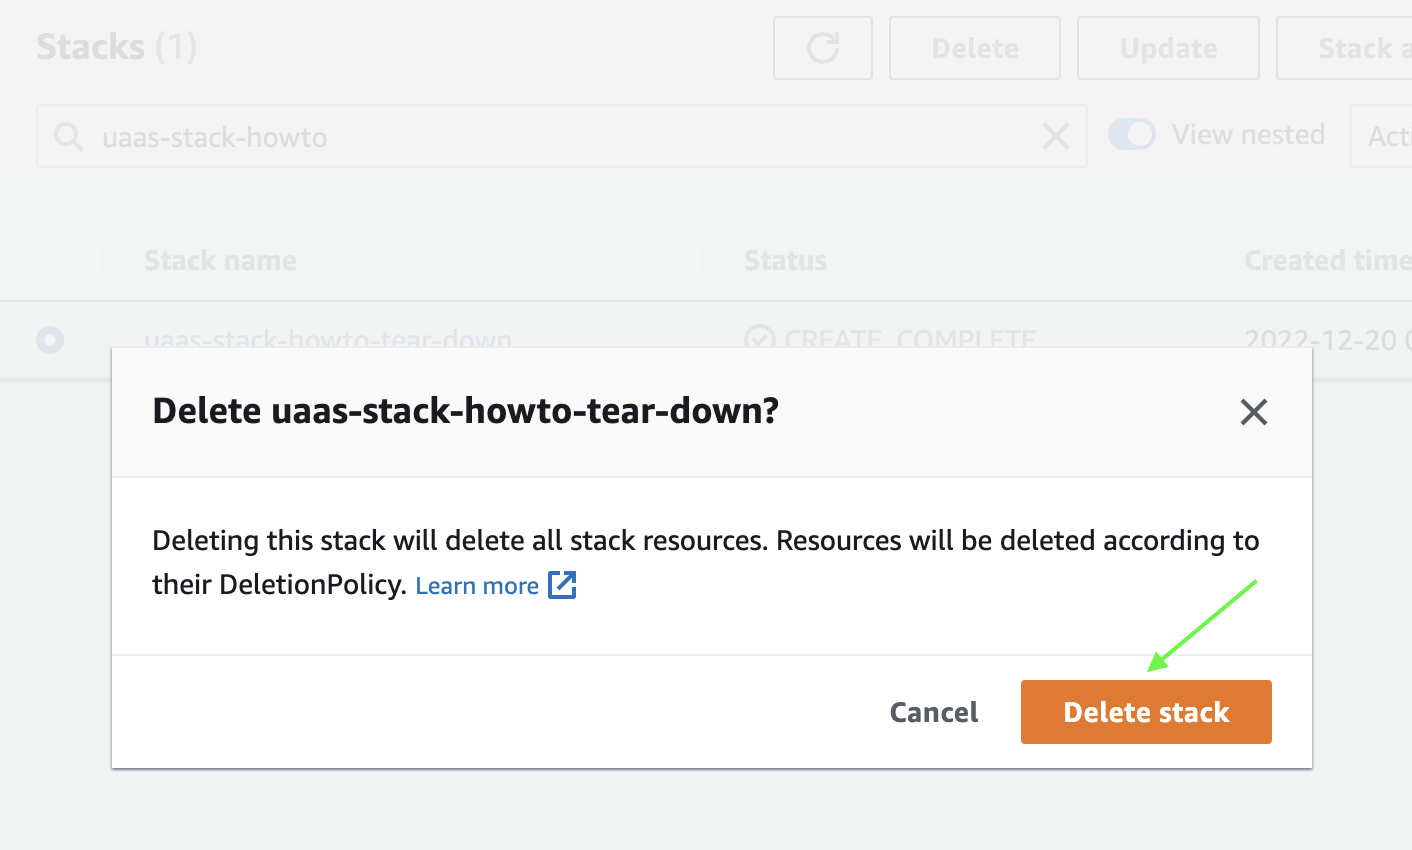
Confirm that you want to delete the stack.
The stack and all of its resources are fully cleaned up. When this process is complete, the status is displayed as

Tearing down using the Command Line
Note
Tearing down using the command line requires the AWS Command Line Interface to be installed.
Tearing down from the command line is a simple one-line command:
aws cloudformation delete-stack --stack-name <myStackName> --role-arn <myRoleArn>
where <myStackName> is the stack name you used when you first deployed the template;
and <myRoleArn> is the IAM role from the Get the Created IAM Role step above.
Removing the stack from your Nasuni account
After tearing down the stack, you can decommission the stack and reclaim its associated serial number.
-
Log into account.nasuni.com
-
Click on the UaaS button in the "UaaS" button in the serial number box.
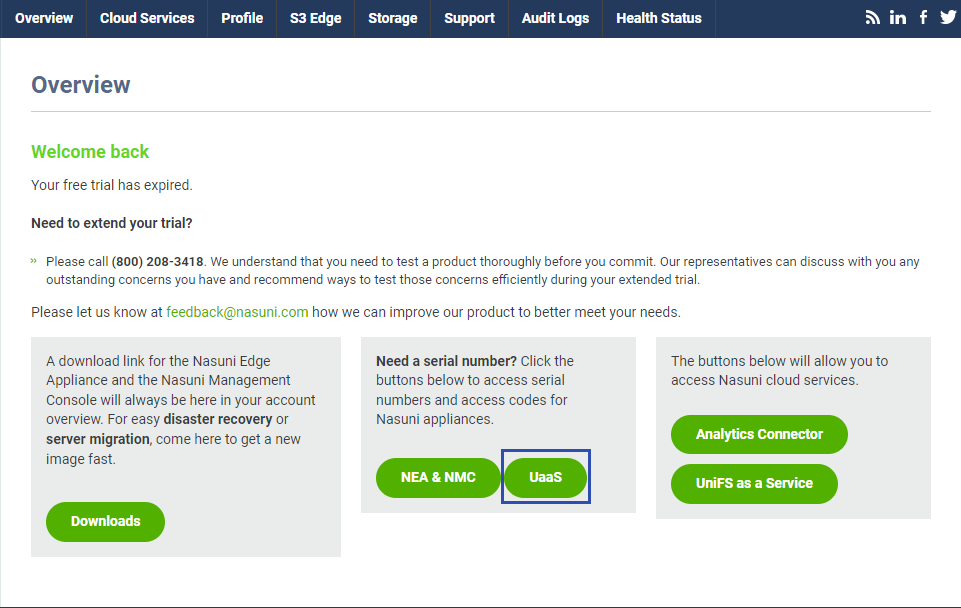
-
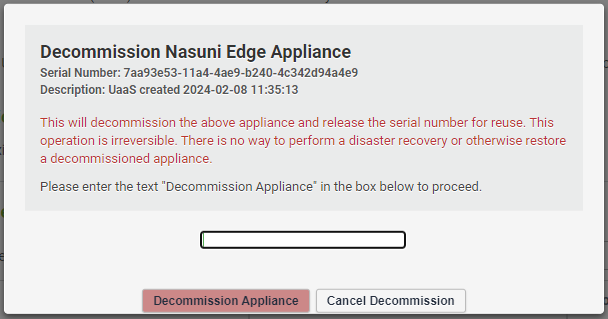
On the serial numbers page, find the row with a "Description" that matches the name of the stack that you have removed and click the "Decommission..." link.
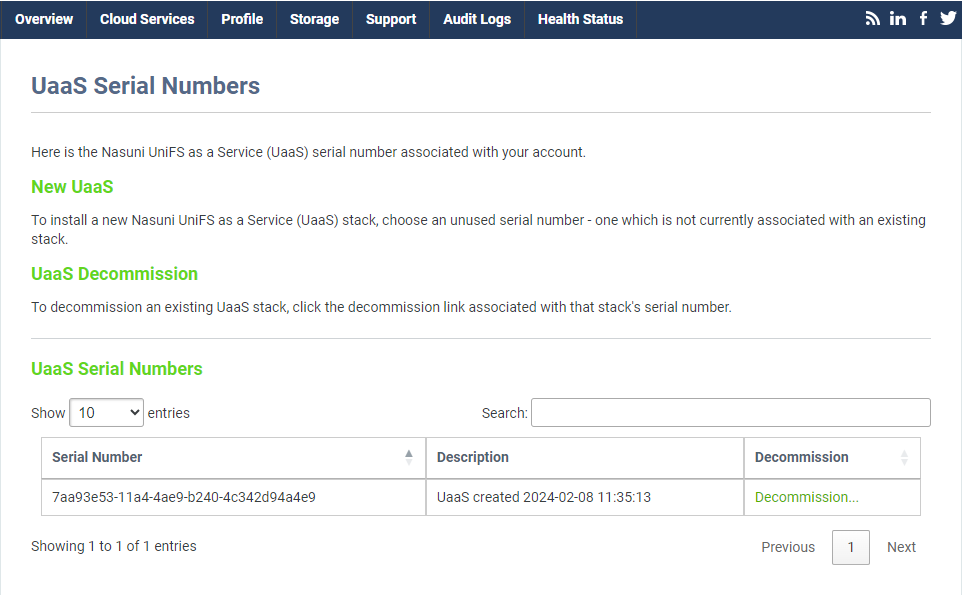
-
Confirm that you want to decommission the stack by entering the required text and click the decommission button.